Platform Navigation
The following information describes the features of the top navigation bar and the left-hand navigation bar in the platform.Top Navigation Bar

1. Add Student button - click to add a new student's details into the Adventus.io platform. For more information about how to add a student, see the article Adding a Student.
Notifications including:
2. Alerts - notifications regarding your students e.g. you will receive alerts when a new student is added; when you have to pay an application fee and so on.
3. Messages - messages sent between you and our Admissions team after the application has been submitted.
4. News - the latest news including invitations to platform training events.
For more information on using notifications, see the article Using Notifications - Messages, Alerts and News.
5. Your account profile - here you can view your account details, change your password, set email notifications and log out
Left-hand Navigation bar

1. Home - click to view the Dashboard. For more information about the dashboard, see the article: My Dashboard Overview.
2. Course Search - undertake a course search without student. For more information about how to use this feature, refer to the article Course Search without a Student.
3. Countries - here you can explore a wealth of information about your student's destination countries.

4. My Students student list - displays a table of your students allocated to you. More information on this below.
5. Unassigned - displays a list of students that have not yet been assigned to a team. Imported students appear in this list. More on this below.
6. Import student leads - here you can import student details into the platform in bulk. For more information about how to import student details into the platform, see the article Importing Students in BULK.
7. Application Stages - these are the stages of the application process. Click an application stage to display a list of students at that stage.
8. Teams - a list of the teams you have created on the platform
9. Settings - you can set up your staff and teams on the platform here, update your plan details and access contact details for your Account Management team.
10. Help - Find information on commission estimates; search the knowledgebase to find information and tutorials about how to use the platform; and find out about the latest webinars available in the Training Hub.
My Students Tables
Student View Table
Access this table from the left-hand navigation bar under Students>My Students. This table lists all students that have been created by you or allocated to you in the platform. Use the switch button, to change between the Student View table and the Applications View table.
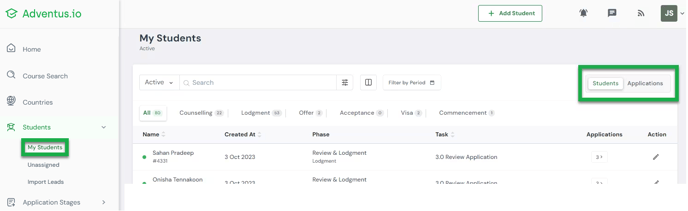
The Student View table is divided into two main sections.
1. Filters and Sorting
2. Student list
Note: Filtering in the Student View table is applied according to student 'Created Date'.

1. Status filter - filter the student list in the table according to their status - Active, Completed, Paused or Inactive.

2. Search field - search for a student in the list by name, email address or Adventus ID
3. Filters - filter the student list according to intake year, intake month, destination or institution. Once selections have been made, click the 'Apply Filters' button

4. Columns - set the columns to show the information about each student that you want to see in the table.

5. Filter by period - select a time period to display a list of students that were created during that period. You can select years, quarters and months or enter a custom date range.
6. Stage filters - filter the list to show students at a particular stage in the process.
Student List

1. Click a student's name to go to the student's page.
2. Click column headers to sort the relevant column alphabetically or numerically, as relevant.
3. Applications column - Click a numbered button to display the list of applications for the student. Each listing includes detail about the intake and application status. Note that applications will only display for students who have been submitted to Adventus. Students with a 'N/A' button have applications that have not yet been submitted to Adventus. Click on an application in the list to go to the Applications page for the student.

4. Action column - click the Action pen icon ( ![]() ) to go to the student's profile page.
) to go to the student's profile page.
Application View Table
Access this table from the left-hand navigation bar under Students>My Students. Then click 'Applications' in the table toggle at the top right of the table.
This table lists all the applications associated with the students you created or were allocated to you. This means there may be more than one listing for a student as they may have several applications. Only applications that are submitted to Adventus will be listed in the table.
The Applications View table is divided into two main sections.
1. Filters and Sorting
2. Applications list
Filters and Sorting
Note: Filtering in the Application View table is applied according to application 'Submitted Date'
1. Search field - search for an application in the list by student name, email address or Adventus ID
2. Filters - filter the application list according to intake year, intake month, destination or institution. If you are a full user of the platform (workplace admin, managers, team leaders), you can also filter by team. Once selections have been made, click the 'Apply Filters' button.

3. Columns - set the columns to show the information about each application that you want to see in the table.

4. Filter by period - select a time period to display a list of applications that were submitted during that period. You can select years, quarters and months or enter a custom date range.
5. Stage filters - filter the list to show applications at a particular stage the application is up to in the process.
Applications List

1. Click the student's name to go to the Student's page.
2. Stage column - indicates the stage the application is at and its current status within that stage.
3. Action eye icon ( ![]() ) - click to go to the student's application page.
) - click to go to the student's application page.
Unassigned Students Table
Access the Unassigned Students table via Students>Unassigned in the left-hand navigation bar.
Unassigned students are students who have not been allocated to anyone in your team or teams; or who were originally allocated to a team member and have been re-assigned to the team pool.
As described above for Active students, you can view the list of students by Student or by Application. You can move between each table using the toggle at the top right of the table.
The Unassigned Students Student View table is divided into two main sections.
1. Filters and Sorting
2. Unassigned Students list
Filters and Sorting
Note: Filtering in the Unassigned Student View table is applied according to student 'Created Date'.

1. Student Status filter - filter the student list in the table according to their status - Active, Completed, Paused or Inactive.
2. Search field - search for a student in the list by student name, email address or Adventus ID
3. Filters - filter the student list according to intake year, intake month, destination or institution. If you are a full user of the platform (workplace admin, managers, team leaders), you can also filter by team. Once selections have been made, click the 'Apply Filters' button.
4. Columns - set the columns to show the information about each student that you want to see in the table.

5. Filter by period - select a time period to display a list of students that were created during that period.
6. Stage filters - filter the list to show students at a particular stage in the process.
Unassigned Student List

1. Click the student's name to go to the student's page.
2. Applications column - Click a numbered button to display the list of applications for the student. Applications will only display for students who have been submitted to Adventus. Students with a 'N/A' button have not yet been submitted to Adventus.
3. Action column - click the plus icon ( ![]() ) to assign this student to yourself.
) to assign this student to yourself.
If you have any queries about using the student tables or platform navigation, please contact your Account Manager for assistance. For any technical difficulties, please contact Technical Support at technicalsupport@adventus.io.