How to use Document Manager
Document Manager makes it easy for you to upload the documents required for your students' applications at the correct time. You can access Document Manager via the Search & Apply menu.

Document Manager is divided into three main sections:
- Documents required before the application is submitted. These include:
- mandatory and any additional application documents required for your student's application.
- Documents required after the application is submitted. These include:
- mandatory and any additional acceptance documents (required after you have received an offer from an institution); and
- mandatory and any additional visa documents (collected for your student's visa application).
- Offer & Confirmation documents - this section is used by our Admissions team to upload any offers or confirmations. You do not need to upload any documents in this section.
Documents Required Before Submitting the Student's Application
When you access Document Manager before application submission, you will see an expanded list of documents that are required. These are shown in the Required application documents section and include all the documents required by the institutions of the shortlisted courses.
Below this, is the Additional application documents section. Here you can upload any additional documents, if required.
You can use the Show all other documents toggle to view a list of other documents that are required later in the process (after application submission).
Using Document Manager - Required Documents
Documents can be uploaded, downloaded, replaced, deleted or added to the list displayed.
Note: Documents can be uploaded, replaced or deleted before the application is submitted. After this time, new documents can be uploaded but existing documents cannot be removed.
The components of the screen are described below:
1. and 2. Document Type - the document required. Here you can download the institution's template, if available. This can then be completed and re-uploaded. You can also click the Download All link to download all the institution's templates at once.
3. Document info - If there is further information regarding the document, this is provided as a Comment link. Click the link to display a pop-up box with the comment text shown. If the document is relevant for more than one institution and there are comments for each, these will be displayed in the one pop-up box.
4. File Name - the document file name is provided including the date it was uploaded
5. Institution - the institution from the shortlisted courses requiring this document
6. and 7. Status and Notes - When you upload a document, the status of the document changes to ‘Pending Review’ and a Notes icon appears. Our Visa Services and Admissions team will review the documents, and change the status to ‘Accepted’ or ‘Rejected with Notes’. You can add notes regarding the document at any time by clicking on the Notes icon.
8. Upload icon - click this button to upload a document. Maximum size 16MB.
9. Upload Additional Files - when a document has been uploaded, the Upload icon changes to an Upload Additional Files icon. Use this to add more than one document relevant to the document type.
10. Actions (ellipsis icon) - here you can upload additional documents for the same document type, download the document, replace the document or delete it.
11. Document counter pill - the document counter shows how many required documents have been uploaded out of a specified total. This is yellow until all documents are uploaded, at which point, it will turn green.
Using Document Manager - Additional Documents
You will only be able to use this section if there are additional document types relevant to the institutions of your shortlisted courses.
To upload an additional document:
1. Select a document type from the drop-down list
2. Click Add.
3. Click the upload button to upload the document.
After you have uploaded all the required documents, you are ready to Review & Submit. If you click Review & Submit before you have uploaded all the required documents, you will get the following alert - please also see important note below.
Click Cancel to return to the Document Manager page, or click Review & Submit to proceed to Review & Submit.
Please note: It is recommended that all required documents are uploaded before the application is submitted to ensure a faster processing time.
IMPORTANT NOTE ABOUT SUBMITTING APPLICATIONS FOR SOME INSTITUTIONS
For a select number of institutions, you will not be able to submit the application unless all the required minimum application documents are uploaded first.If you are applying for an institution in this situation, the following alert will be shown if all the required documents have not been uploaded.
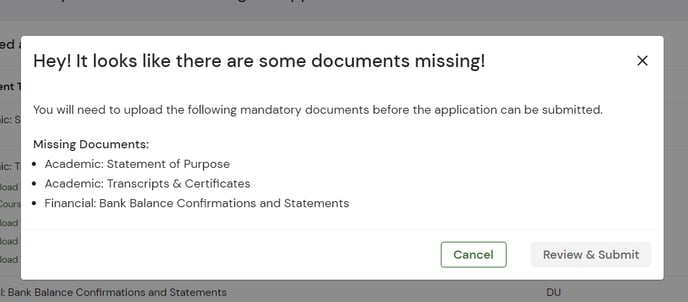
You will notice too that the Review & Submit button is 'greyed out' in the image above and can't be clicked, indicating that this action can not be taken because some required documents are not uploaded.
Documents Required After Submitting the Student's Application
After submitting the student's application, you will need to return to the Document Manager to upload any required Acceptance and Visa documents. Use the arrows (v) next to each section to expand the list of required documents. These sections work in a similar way to those described above.
If you have any queries about using Document Manager, please contact your Account Manager for assistance. For any technical difficulties, please contact Technical Support at technicalsupport@adventus.io