Introduction
Once you have set up your Adventus workspace to be able to receive Facebook leads, you will need to create a lead ad form which students will complete and their details sent to your workspace for you to manage.
Creating lead ads is one component of the Campaign creation process in Facebook. This article focuses mostly on the steps to create a lead ad. Creating campaigns and ad sets will be mentioned briefly. However, you can obtain further information from the range of Facebook articles that are available.
If you have not yet set up your Adventus workspace to receive Facebook leads, refer to Facebook Leads in Platform - Part 1 - Setting up your Workspace.
Before you Begin
Before you begin, you will need to have set up a Facebook Ad account. For assistance with this, refer to: Steps To Take To Set Up Your Facebook Ads Manager Account.
Watch these two videos to help with the steps or read on below!
Create a Lead Ad Form in Facebook
Step 1: Create a Campaign and Ad Sets
The first steps in the process to create a lead ad form are to set up a campaign and the ad set(s) (target audience) on Facebook that the lead ad will target.
To start this from your business.facebook.com page:
a. In the left-hand menu, select More Tools
b. Select Ads Manager. If relevant, select the business page for the ad. This displays the Campaigns page.

c. Click +Create

d. Select Lead Generation as a Campaign Objective.
e. Click the arrow half-way down the pop-up box.
f. Enter a name for your Campaign, describe Ad Set and name the Ad. Then click Continue.

g. Complete the information required for setting up your campaign and the ad set/s.

Note: When completing the Placements section of the Ad Sets, note that you can select to have ads sent to multiple platforms, including Facebook, Instagram, Audience Network and Messanger.
![]() Need further help? There are a number of useful articles available to assist you in this process. Here is some information from Facebook to assist.
Need further help? There are a number of useful articles available to assist you in this process. Here is some information from Facebook to assist.
Step 2: Create a Lead Ad
When you have finished creating the campaign and entering information for the campaign audience (the adset/s) you can create the lead ad form.
a. Select the Ad or click Next in the bottom, right-hand corner.

b. Complete the following sections:
-
Identity - ensure the correct page is selected.
-
Ad setup - the ad will use a single image, video or carousel (a set of two or more scrollable images or videos).
-
Ad Creative - upload the created media or choose from your account/page/Instagram images. Ensure you select suitable images for each 'placement' ie. Facebook, Instagram etc. Enter the relevant Primary Text and a Headline. Select a Call to action (i.e. button text, for example ‘Learn More’).
c. Under Instant Form, you can either use a form from the list, duplicate an existing form or click Create Form.

d. Under the Content tab, enter the Form Name
e. Select the Form Type

f. Under Intro, select the image for your form, enter the Headline and Description relevant to the ad. Note: You also have the option to ‘Remove Greeting’, if preferred.

g. Under Questions:
-
Add the Description to let people know how the information they give you will be used or shared. (Compulsory)
-
Review the fields automatically listed. You can remove these, or re-order them by clicking and dragging.
-
Click + Add Category to add other standard fields provided by Facebook
-
Use + Add question to add non-standard questions.

Note: Check with your company’s legal team about the questions you are asking in the form.
The following is a list of standard Facebook fields (and some non-standard ones) accepted by the Adventus platform.
Standard Fields (provided by Facebook) |
Non-Standard Fields |
|---|---|
| First Name (given name) | Field of study |
| Last Name (family name) | Preferred country |
| Preferred institution | |
| Phone | |
| City | |
| Country | |
| Date of Birth Note: The Date of Birth field cannot be used in Instagram ads. |
Note: You can still use any other non-standard fields of your choosing. The content from these fields will appear in the Payload tab of the student profile in the platform. The Payload tab is illustrated in the ‘What Happens Next’ section below.
h. Under Privacy, include a link to your company Privacy Policy and a Custom disclaimer - see the note below
Note: It is recommended that you copy and paste Section 2 of the Notice: Recruiter Terms for Social Media Data Collection and Use into your own Terms and Conditions. This is available on the Adventus platform under Settings.
i. Enter all details required under Completion. Entering a thank you message and other information helps keep your leads engaged after they’ve submitted the form.
Step 3: Link Lead Ad Form with Your Workspace on the Platform
You now need to link the Facebook form to your Adventus account.
a. Click the Settings tab

b. Under Form configuration, in the Sharing section, select Open
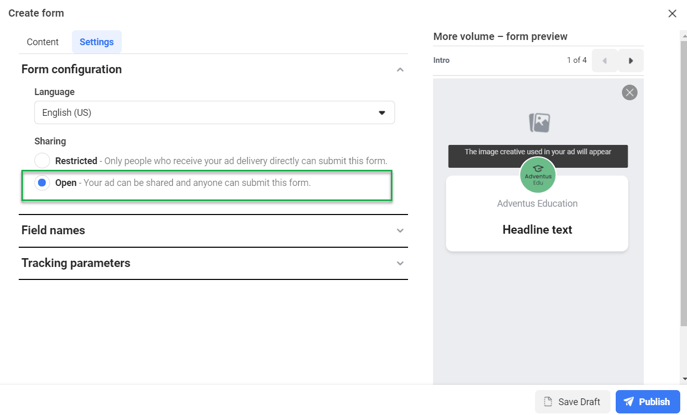
c. Scroll down to Tracking Parameters
d. Enter adventus_lead_integration_code under Parameter Name
e. Enter your Adventus workplace code under Parameter Value.

This code can be found in the Adventus Platform under Settings>Facebook Lead Integration.
f. Once the form has been created and you have reviewed the campaign, click Publish, or click Save Draft if you still want to make changes
Note: Once a form has been published, you can’t edit it.
Following publishing, the ad will be reviewed by Facebook and once approved, the campaign will become active. The ad will appear in the news feed of the ad’s target audience who match one or more of the target criteria.
Step 4. Test your Lead Ad (this is an optional step)
Facebook has a developer site where you can preview your lead ad and test to see that it is working properly.
To test your lead ad:
a. Go to the following Facebook page: https://developers.facebook.com/tools/lead-ads-testing/
You will arrive at the Lead Ads Testing Tool page.

b. Select the business Page you used for creating your campaign and lead ad.
c. Select the lead ad Form.

d. Click Preview form

e. Complete all the fields in the form as if you were a student, click Next and Submit the form.

You will get a message that your form has been submitted.

Note: You can only complete one test form at a time. If you want to complete another test form, click Delete lead. You can then click Preview form, complete the form and submit the form again. Clicking Delete Lead does not delete the lead you submitted, it just clears the form.
To view the lead in the Adventus platform, see the next section, What Happens Now?
What Happens Now?
When a student has submitted their details in the form on Facebook, the information will come through to your workspace under Unassigned Student. The student will be indicated in the Lead Management phase.

All data from Facebook can be found under Student Information>Student Details, in the Payload tab. If you had used custom fields in your lead form, the details that the student entered will be found here.

Further Notes
1. Student Portal
If you are on the Growth, Power or Enterprise plan and have the Student Portal switched on, you will need to confirm the student’s email details are correct and then click the Send Student Portal/Student App link button to ensure they get an email link for the Student Portal.
2. Leads with Duplicate Emails
You may get a situation where a student has filled out a Facebook form twice. Both leads will come into the Platform. If the same email has been used, you will get the following error message when you try to save the student details.

In order to save the student’s details, you will need to adjust the email in the student’s details or adjust the email shown in the student details of the second listing for the student.
If you have any queries about creating lead ads in Facebook, please contact your Account Manager for assistance. For any technical difficulties, please contact Technical Support at technicalsupport@adventus.io.