You can conduct a studentless search via the Course Search (magnifying glass) button on the navigation bar.
|
Before exploring the Course Search, please take a look at our featured institution on the Course Search landing page. You may want to consider this institution as a destination for your student. |


There are five key steps to using Course Search
-
Select a Student Nationality to start your Search
-
Set the search criteria
-
View courses shown in the Search Results
-
Add the search results to a new or existing student
-
Adding your preferred courses to the Shortlist for the student
1. Select a Student Nationality
To begin, you will need to select a nationality as if you were searching on behalf of an actual student. This will tailor the resulting search to your needs ensuring only relevant courses are shown.
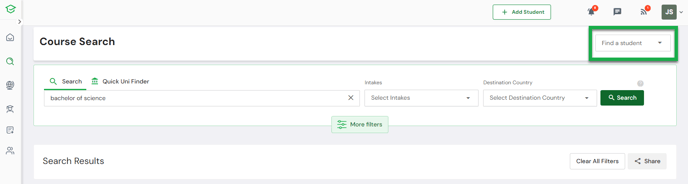
2. Set the Search Criteria
Keyword Search
Here you enter details of the type of courses you are searching for by typing keywords into the Search field and then clicking the Search button. You can enter information such as the name of the course, the institution, the destination country, the study level and more.
Filters
Use filters to refine your search further. You can select from Intakes and Course Levels and if you wish to choose from other filters, select options in the left-hand pop-up panel. This left-hand panel can be opened or closed using the More filters button.
For more information about how to use the Course Search filters, see Using the Course Search Filters.
Tailored Search
As described above, the Nationality and Country of Residence (if relevant) chosen above creates an initial list of course results tailored to these selections. In the More Filters panel, the Nationality and Country of Residence (for onshore students only) fields are editable (see image above). This allows you to change these preferences if you wish.
Clear All Filters
At any point, click the Clear All Filters button to reset the filters back to the default.

3. View courses shown in the Search Results
Search Results Count
This displays the total number of results as per the search criteria set above. .
.
Sorting Results
You can sort the list of courses by relevance, Intake (Earliest to Latest), Turnaround Time (Low to High), THE or QS rank or cost.
Drive Courses Only Switch
Switching on the Drive Institution toggle will only show Adventus Drive Institution courses in the results list.
Adventus Drive institutions are our Adventus Drive partner institutions - highly active in our marketplace, averaging lower turnaround times and higher acceptance rates and are some of the most popular student destinations.

Course Listings
Course details are presented as course cards. Click a course card to reveal the Course Details which contain a wealth of information about the course, the institution, scholarships, the destination country and more. For more information about course cards, see the article Institution Course Information Cards.
View Intakes on Course Cards
The next upcoming intake is shown on each course card, where relevant and available. Where further future intakes are available, click the More button to see the full list displaying intakes up to three years in advance.

Where all intakes for a quarter are available for applications, this is indicated by a dark green icon. If all intakes for a particular quarter are unavailable for applications, they will be crossed out and appear with a grey icon. If there are some intakes available in a quarter and some not, this will be indicated by a light green icon. 
In addition, we will let you know on the course card if the next intake is closing soon. If the intake is closing within 2 weeks, a 'Closing Soon' badge will display next to the intake information. If the intake is closing within 2 days, a 'Hurry Final Days' badge will display. If the application deadline has passed, an 'Applications Closed' badge will display.
Export the Search Results
Conveniently, you can export up to 20 Search results at a time.
To export the results to Excel:
-
Click Share in the Search action bar
-
Select the fields you would like to export
-
Select the listings you want to export
-
Click Export to Excel

4. Apply the course results to a new or existing student
When you have completed your search, you can:
-
apply it to a new student by clicking Add Student
-
apply it to an existing student by using the Find a Student field to locate the student. You can begin typing the student’s name and a relevant list will display
Apply a new student to the search:


Note: You only need to complete the Student Profile to create a student.
Next, go to Search & Apply > Course Search. You will notice that the course search results you produced earlier have been associated with the new student.
Apply an existing student to the search:

Note: The names in the list are the students you have access to.
5. Add your preferred courses to the Shortlist for the student
When you find a course that your student may like to apply for, click Add for Shortlist at the top-right of the card. This sends the course to the Shortlist page where you can choose to rank it in your top courses.
When you add a course to the Shortlist, the Add for Shortlist button changes to Saved for Shortlist.

Course Recommendations
As you add courses to your shortlist, you may notice a course recommendation pop-up at the top right of the page. This gives you the opportunity to consider other suitable course options you may have missed in your initial search. The course displayed can be added to the Shortlist and is a good fit with the courses you have selected for your student, matching closely to study area, destination, course level, course cost, grade and language requirements.
Course Closed for Applications
If an institution is not currently taking applications for a particular course, an 'Applications Closed' label will appear on the course card. You are not able to add a closed course to the Shortlist.
When the course re-opens for applications, you will be able to add the course to the Shortlist. You can find out when the course next re-opens for applications via the notification in the Course Details page, under Course Dates.
Next Steps
When you have selected your list of preferred courses, you will then need to create a ranked shortlist from this list.
Clicking the Begin Application button will take you to the Shortlist page.
Find out more about this process by reading the article Shortlist and Rank Courses.
If you have already created a shortlist for your student, you can click the Begin Application button to get started on the application. For more information about creating an application, see the article Student Application.
What should I do if the course search shows no results?
If your current offshore licenses don't cover the selected nationality, no course search results will display.
Note: If the selected country of residence is not covered by your current onshore licenses, the search will only include results applicable for the selected nationality (as long as the nationality is one of your licenced countries). Relevant courses for their onshore status will not be displayed.
You can upgrade your licences by upgrading your plan (via Settings>My Plan) or you can discuss this with your Regional Manager. You can find the contact details for your Regional Manager in the Adventus.io platform under Settings>Account Management Team.
If you have any queries about Studentless Search, please contact your Account Manager for assistance. For any technical difficulties, please contact Technical Support at technicalsupport@adventus.io